.ps1スクリプトをGUI化してついでに.exe化もした件
最近、私が個人的に作ったps1スクリプトを身内向けに配布することになったのでスクリプトをGUI化しました。

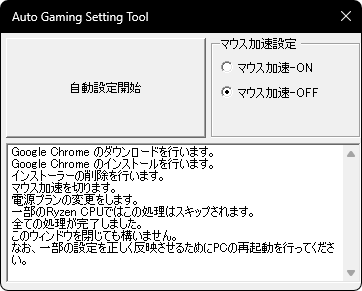
自動設定開始ボタンをクリックするとテキストボックスに処理内容が出力されるおまけ付き。
ついでにGitHubにも公開したので、誰でもダウンロードできるようしました。
github.com
ページ右側にある「Release」から現在公開されている一番最新の物をダウンロードしてお使いください。

続きでコードと超雑な解説。
# Auto Gaming Setting Tool Ver.GUI

# アセンブリの読み込み
[void] [System.Reflection.Assembly]::LoadWithPartialName("System.Drawing")
[void] [System.Reflection.Assembly]::LoadWithPartialName("System.Windows.Forms")

# 先に関数定義をしたくないので
$SKIP=$true;iex ((gc $MyInvocation.InvocationName|%{
    if ($SKIP -and ($_ -notmatch "^####FuncDef\s*$")){return}
    $SKIP=$false
    $_
})-join "`r`n")

# フォームの設定
$Form = New-Object System.Windows.Forms.Form
$Form.Size = New-Object System.Drawing.Size(380,300)
$Form.Text = "Auto Gaming Setting Tool"
$Form.MaximizeBox = $false
$Form.MinimizeBox = $false
$Form.FormBorderStyle = "Fixed3D"
#$Form.ShowInTaskbar = $false
$Form.ShowIcon = $false

# ボタンの設定
$Button = New-Object System.Windows.Forms.Button
$Button.Location = New-Object System.Drawing.Point(5,5)
$Button.Size = New-Object System.Drawing.Size(200,100)
$Button.Text = "自動設定開始"
$Form.Controls.Add($Button)
$Button.Add_Click({Btn_Click})

# ラジオボックスの設定
$MyGroupBox = New-Object System.Windows.Forms.GroupBox
$MyGroupBox.Location = New-Object System.Drawing.Point(210,5)
$MyGroupBox.Size = New-Object System.Drawing.Size(150,100)
$MyGroupBox.Text = "マウス加速設定"

$ON = New-Object System.Windows.Forms.RadioButton
$ON.Location = New-Object System.Drawing.Point(10,15)
$ON.Size = New-Object System.Drawing.Size(100,30)
$ON.Text = "マウス加速-ON"

$OFF = New-Object System.Windows.Forms.RadioButton
$OFF.Location = New-Object System.Drawing.Point(10,40)
$OFF.Size = New-Object System.Drawing.Size(110,30)
$OFF.Checked = $True
$OFF.Text = "マウス加速-OFF"

# グループにラジオボタンを入れる
$MyGroupBox.Controls.AddRange(@($ON,$OFF))
$Form.Controls.Add($MyGroupBox)
# $Form.TopMost

# テキストボックスの設定
$TextBox = New-Object System.Windows.Forms.Textbox
$TextBox.Location = New-Object System.Drawing.Point(5,110)
$TextBox.Size = New-Object System.Drawing.Size(355,140)
$TextBox.Multiline = $True
$TextBox.ScrollBars = [Windows.Forms.ScrollBars]::Vertical
$Form.Controls.Add($TextBox)

# フォームの表示
$Form.Icon = $MyIcon
$Form.Add_Shown({$Form.Activate()})
$Form.TopMost = $True
$DialogResult = $Form.ShowDialog()

####FuncDef
function Btn_Click(){
    # Google ChromeのDL&インストール
    $TextBox.AppendText("Google Chrome のダウンロードを行います。`r`n")
    $Path = $env:TEMP
    $Installer = "chrome_installer.exe"
    Invoke-WebRequest "https://dl.google.com/tag/s/appguid%3D%7B8A69D345-D564-463C-AFF1-A69D9E530F96%7D%26browser%3D0%26usagestats%3D1%26appname%3DGoogle%2520Chrome%26needsadmin%3Dprefers%26brand%3DGTPM/update2/installers/ChromeSetup.exe" -OutFile $Path\$Installer
    $TextBox.AppendText("Google Chrome のインストールを行います。`r`n")
    Start-Process -FilePath $Path\$Installer -Args "/silent /install" -Verb RunAs -Wait
    $TextBox.AppendText("インストーラーの削除を行います。`r`n")
    Remove-Item $Path\$Installer

    if($OFF.Checked){
        $TextBox.AppendText("マウス加速を切ります。`r`n")
        # マウス加速をOFF
        $reg_path = "HKCU:\Control Panel\Mouse"
        $reg_key1 = "MouseSpeed"
        $reg_key2 = "MouseThreshold1"
        $reg_key3 = "MouseThreshold2"
        # キーを更新する
        Set-ItemProperty $reg_path -name $reg_key1 -value "0"
        Set-ItemProperty $reg_path -name $reg_key2 -value "0"
        Set-ItemProperty $reg_path -name $reg_key3 -value "0"
    }

    $TextBox.AppendText("電源プランの変更をします。`r`n")
    $TextBox.AppendText("一部のRyzen CPUではこの処理はスキップされます。`r`n")
    # 電源プランの変更
    $ReturnData = New-Object PSObject | Select-Object CPUName
    $Win32_Processor = Get-WmiObject Win32_Processor
    $ReturnData.CPUName = @($Win32_Processor.Name)[0]
    if ($ReturnData.CPUName -Like "AMD Ryzen * 5**0*") {
        # 休止状態を無効にし、高速スタートアップを自動的に無効化させる
        powercfg /hibernate off
        powercfg -setacvalueindex scheme_balanced sub_buttons pbuttonaction 3
    } else {
        # 電源プランを高パフォーマンスに変更
        powercfg /setactive scheme_min
        powercfg /hibernate off
        powercfg -setacvalueindex scheme_min sub_buttons pbuttonaction 3
    }
    $TextBox.AppendText("全ての処理が完了しました。`r`n")
    $TextBox.AppendText("このウィンドウを閉じても構いません。`r`n")
    $TextBox.AppendText("なお、一部の設定を正しく反映させるためにPCの再起動を行ってください。`r`n")
}
簡単な処理しか記述していないので、powershellを普段から触っている人にとって解説は不要だと思いますが一応。
[void] [System.Reflection.Assembly]::LoadWithPartialName("System.Drawing")
[void] [System.Reflection.Assembly]::LoadWithPartialName("System.Windows.Forms")
Windows Formを使うためにアセンブリをロードしています。
# 先に関数定義をしたくないので
$SKIP=$true;iex ((gc $MyInvocation.InvocationName|%{
    if ($SKIP -and ($_ -notmatch "^####FuncDef\s*$")){return}
    $SKIP=$false
    $_
})-join "`r`n")
powershellだと関数はmain処理より先に記述しないとエラーを吐きますが、個人的に先に関数を記述するのは好きではありません。
何か後記述できる良い方法はないかと調べた結果、良さげなものがあったのでコピペしてます。
plaza.rakuten.co.jp
「#####FuncDef」というコメントアウトの次行へ関数の処理を記述すればエラー出ません。
$Form = New-Object System.Windows.Forms.Form
$Form.Size = New-Object System.Drawing.Size(380,300)
$Form.Text = "Auto Gaming Setting Tool"
$Form.MaximizeBox = $false
$Form.MinimizeBox = $false
$Form.FormBorderStyle = "Fixed3D"
#$Form.ShowInTaskbar = $false
$Form.ShowIcon = $false
ウィンドウの初期設定です。
・ウィンドウタイトルの変更、最大化、最小化ボタンの非表示化
・ウィンドウアイコンを非表示化
が主な処理です。
# ボタンの設定
$Button = New-Object System.Windows.Forms.Button
$Button.Location = New-Object System.Drawing.Point(5,5)
$Button.Size = New-Object System.Drawing.Size(200,100)
$Button.Text = "自動設定開始"
$Form.Controls.Add($Button)
$Button.Add_Click({Btn_Click})
ボタンの配置や描画設定です。
ボタンがクリックされた際に後記述された関数「Btn_Click」の処理が実行されます。
# ラジオボックスの設定
$MyGroupBox = New-Object System.Windows.Forms.GroupBox
$MyGroupBox.Location = New-Object System.Drawing.Point(210,5)
$MyGroupBox.Size = New-Object System.Drawing.Size(150,100)
$MyGroupBox.Text = "マウス加速設定"

$ON = New-Object System.Windows.Forms.RadioButton
$ON.Location = New-Object System.Drawing.Point(10,15)
$ON.Size = New-Object System.Drawing.Size(100,30)
$ON.Text = "マウス加速-ON"

$OFF = New-Object System.Windows.Forms.RadioButton
$OFF.Location = New-Object System.Drawing.Point(10,40)
$OFF.Size = New-Object System.Drawing.Size(110,30)
$OFF.Checked = $True
$OFF.Text = "マウス加速-OFF"

# グループにラジオボタンを入れる
$MyGroupBox.Controls.AddRange(@($ON,$OFF))
$Form.Controls.Add($MyGroupBox)
# $Form.TopMost
一部ユーザーはマウス加速を切らないらしいので、マウス加速を切るかどうかはラジオボックスで設定できるようにしました。
初期ではマウス加速-OFF(マウス加速を切る)にチェックが入っています。
# テキストボックスの設定
$TextBox = New-Object System.Windows.Forms.Textbox
$TextBox.Location = New-Object System.Drawing.Point(5,110)
$TextBox.Size = New-Object System.Drawing.Size(355,140)
$TextBox.Multiline = $True
$TextBox.ScrollBars = [Windows.Forms.ScrollBars]::Vertical
$Form.Controls.Add($TextBox)
処理結果を表示するためのテキストボックスを配置しています。
# フォームの表示
$Form.Icon = $MyIcon
$Form.Add_Shown({$Form.Activate()})
$Form.TopMost = $True
$DialogResult = $Form.ShowDialog()
今まで設定したFormを表示する部分です。
3行目はもしかしたらいらないかも。
これ以降の処理は過去に解説しているので割愛します。
スクリプトをexe化する方法については解説が死ぬほど面倒くさいので、以下のサイトを参照してください。
lil.la
注意点としては、バージョン情報などをiexpressで編集するのは死ぬほど面倒くさいので、ResourceHackerで編集してください。
ResourceHackerも面倒くさいですが、iexpressで編集するより1兆倍マシです。
あと、配布する際には必ずiexpressの設定で「powershell.exe -executionpolicy ByPass <FileName>」と記述するのをお忘れなく。(<FileName>の部分は自分のスクリプトのファイル名を入力してください)
executionpolicyをRemoteSignedとかにしていると一瞬だけ起動してすぐ終了してしまいます。